使用 React 和 Firebase 创建 Github 博客
把博客托管在 Github 的一般做法是使用 Github Page 自带的 jekyllrb 来生成页面,比如你现在看的这个网站。现在我要介绍另一种方法,使用 React 和 Firebase。
关于 React 就不多介绍了,已经有三年历史了,面子书出品,目前人气依旧旺盛。而 Firebase 是一个储存数据和管理 API 的工具网站(简单理解是这样),现在归于孤狗旗下了。看到这,应该明白这种博客形式的实现原理了吧…..
废话不多说,Let’s Rock N’ Roll…
第一步:从 Firebase 开始
使用 Google 账号登录 Firebase,然后创建项目。
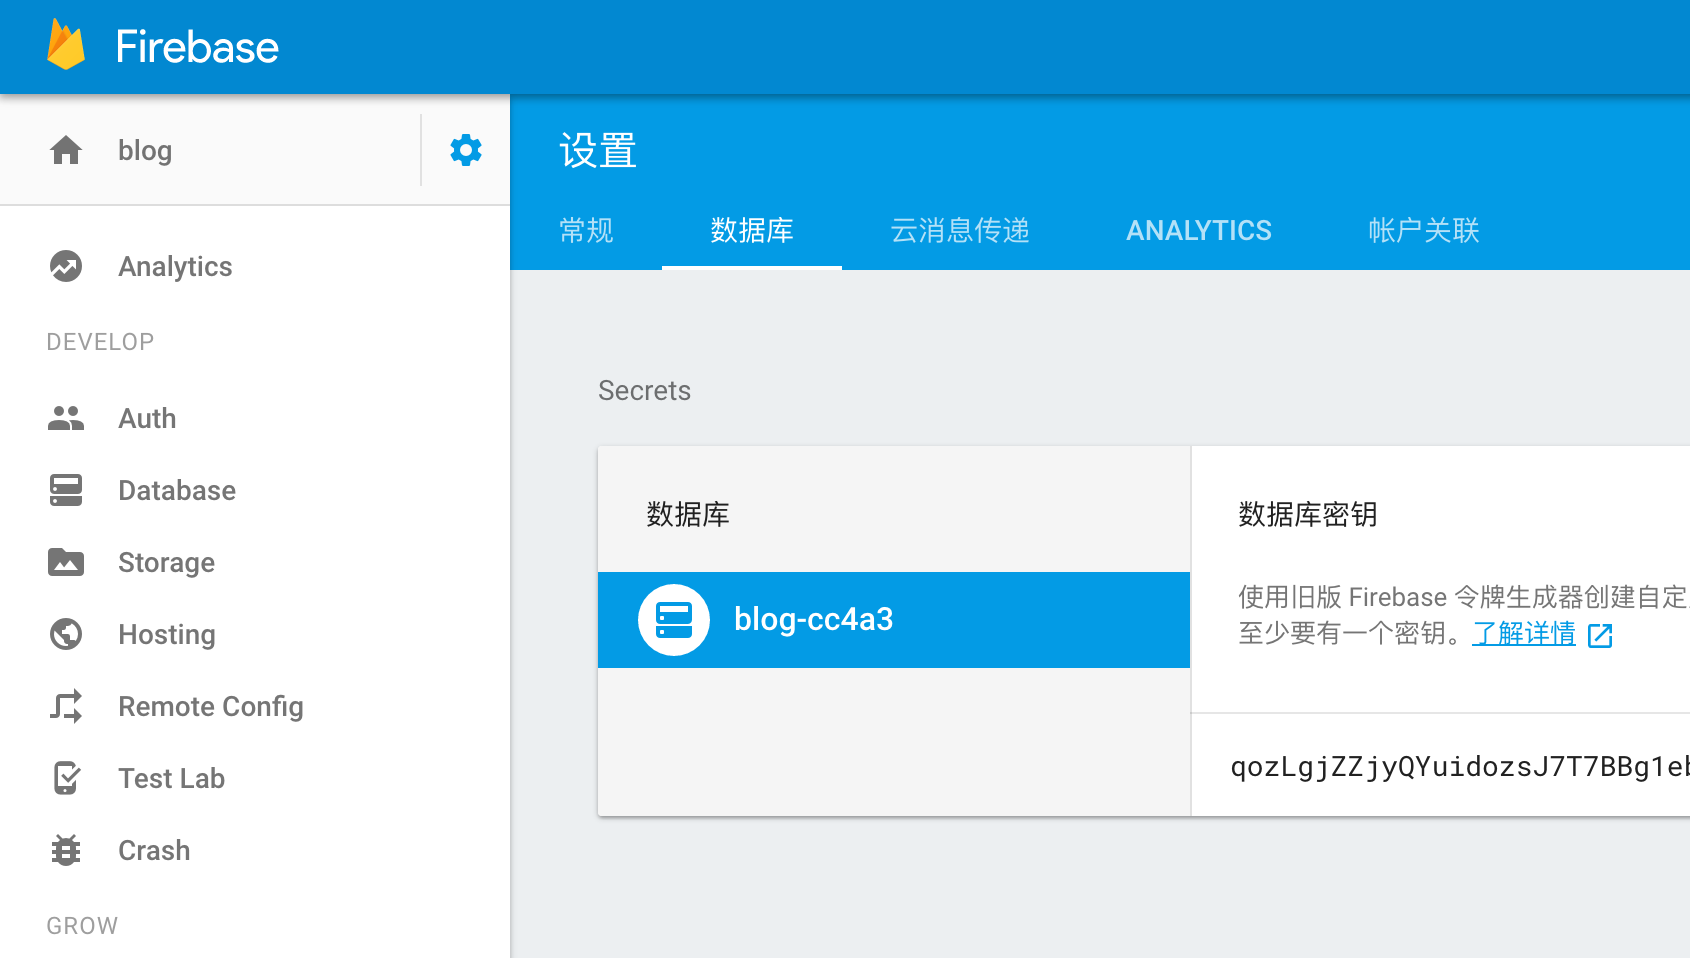
然后从设置(齿轮图标)进入 数据库 选项获取 API key,它是一个字符串,差不多长这样,qozLgjZZjyQYuidozsJ7T7BBgZUxoaNnddhaEz0z 。
接着设置 Firebase 数据库的授权规则,从左侧的 Database 选项进入 规则 选项。这个项目孤狗有点翻译不到位,时而中文时而英文,将就一下。
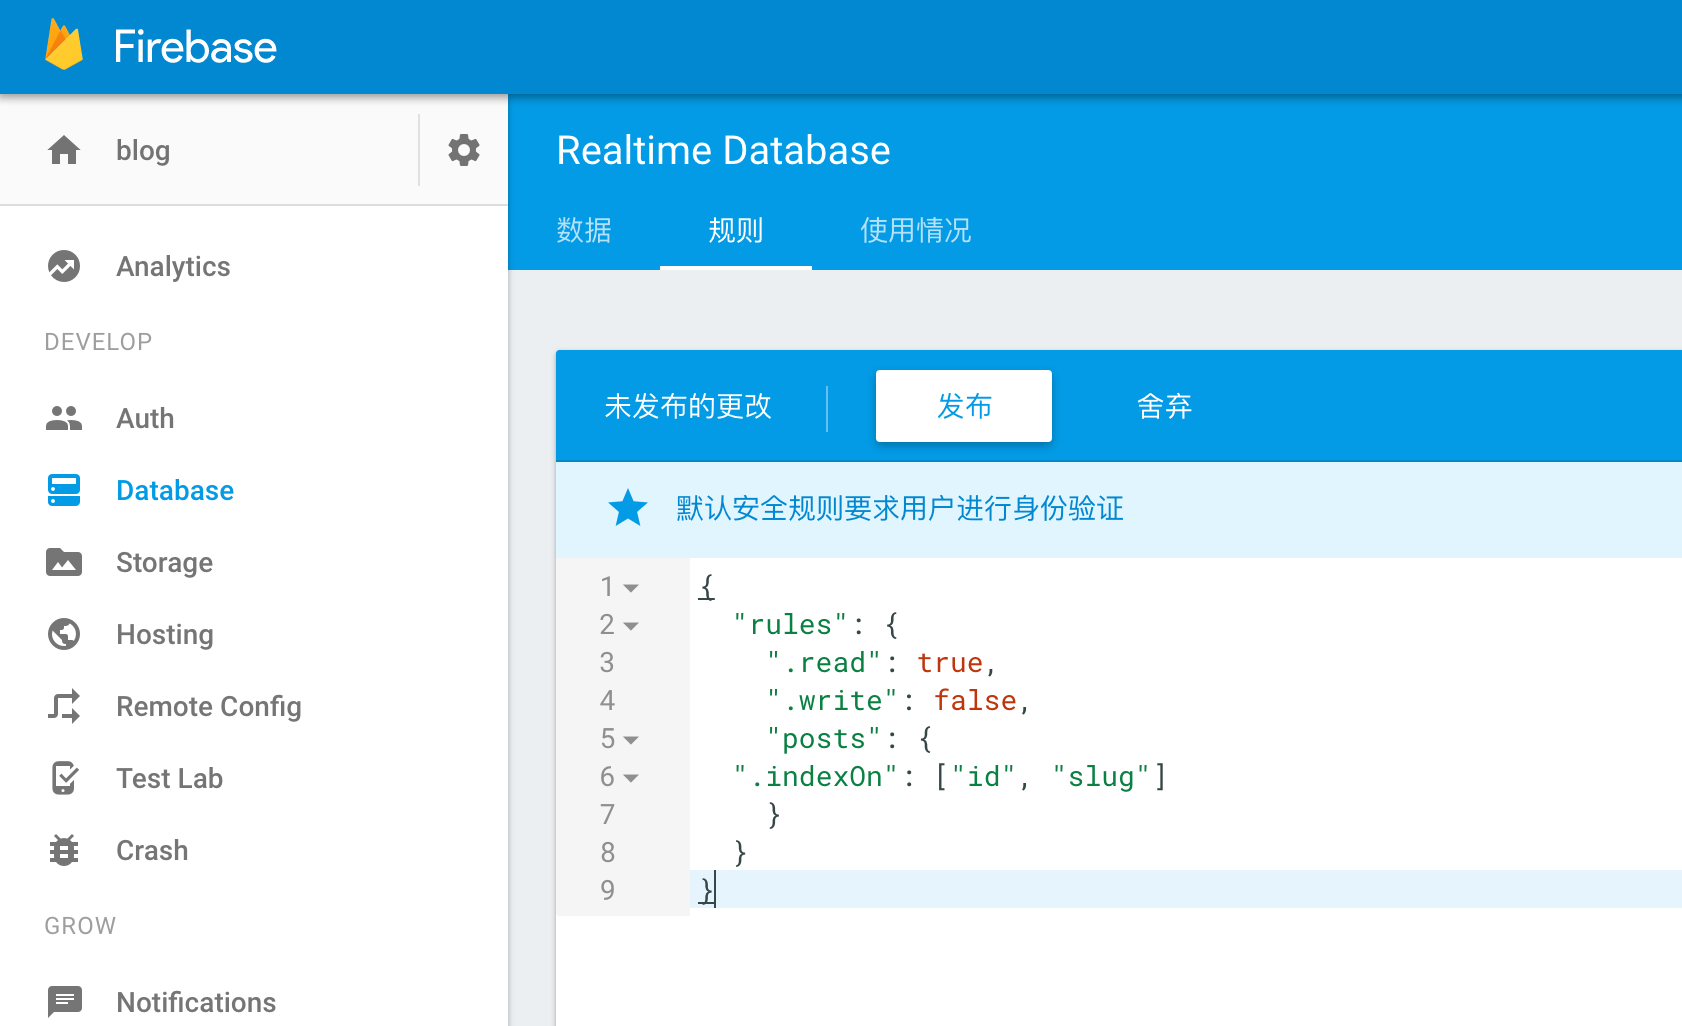
添加的规则如下:
{
"rules": {
".read": true,
".write": false,
"posts": {
".indexOn": ["id", "slug"]
}
}
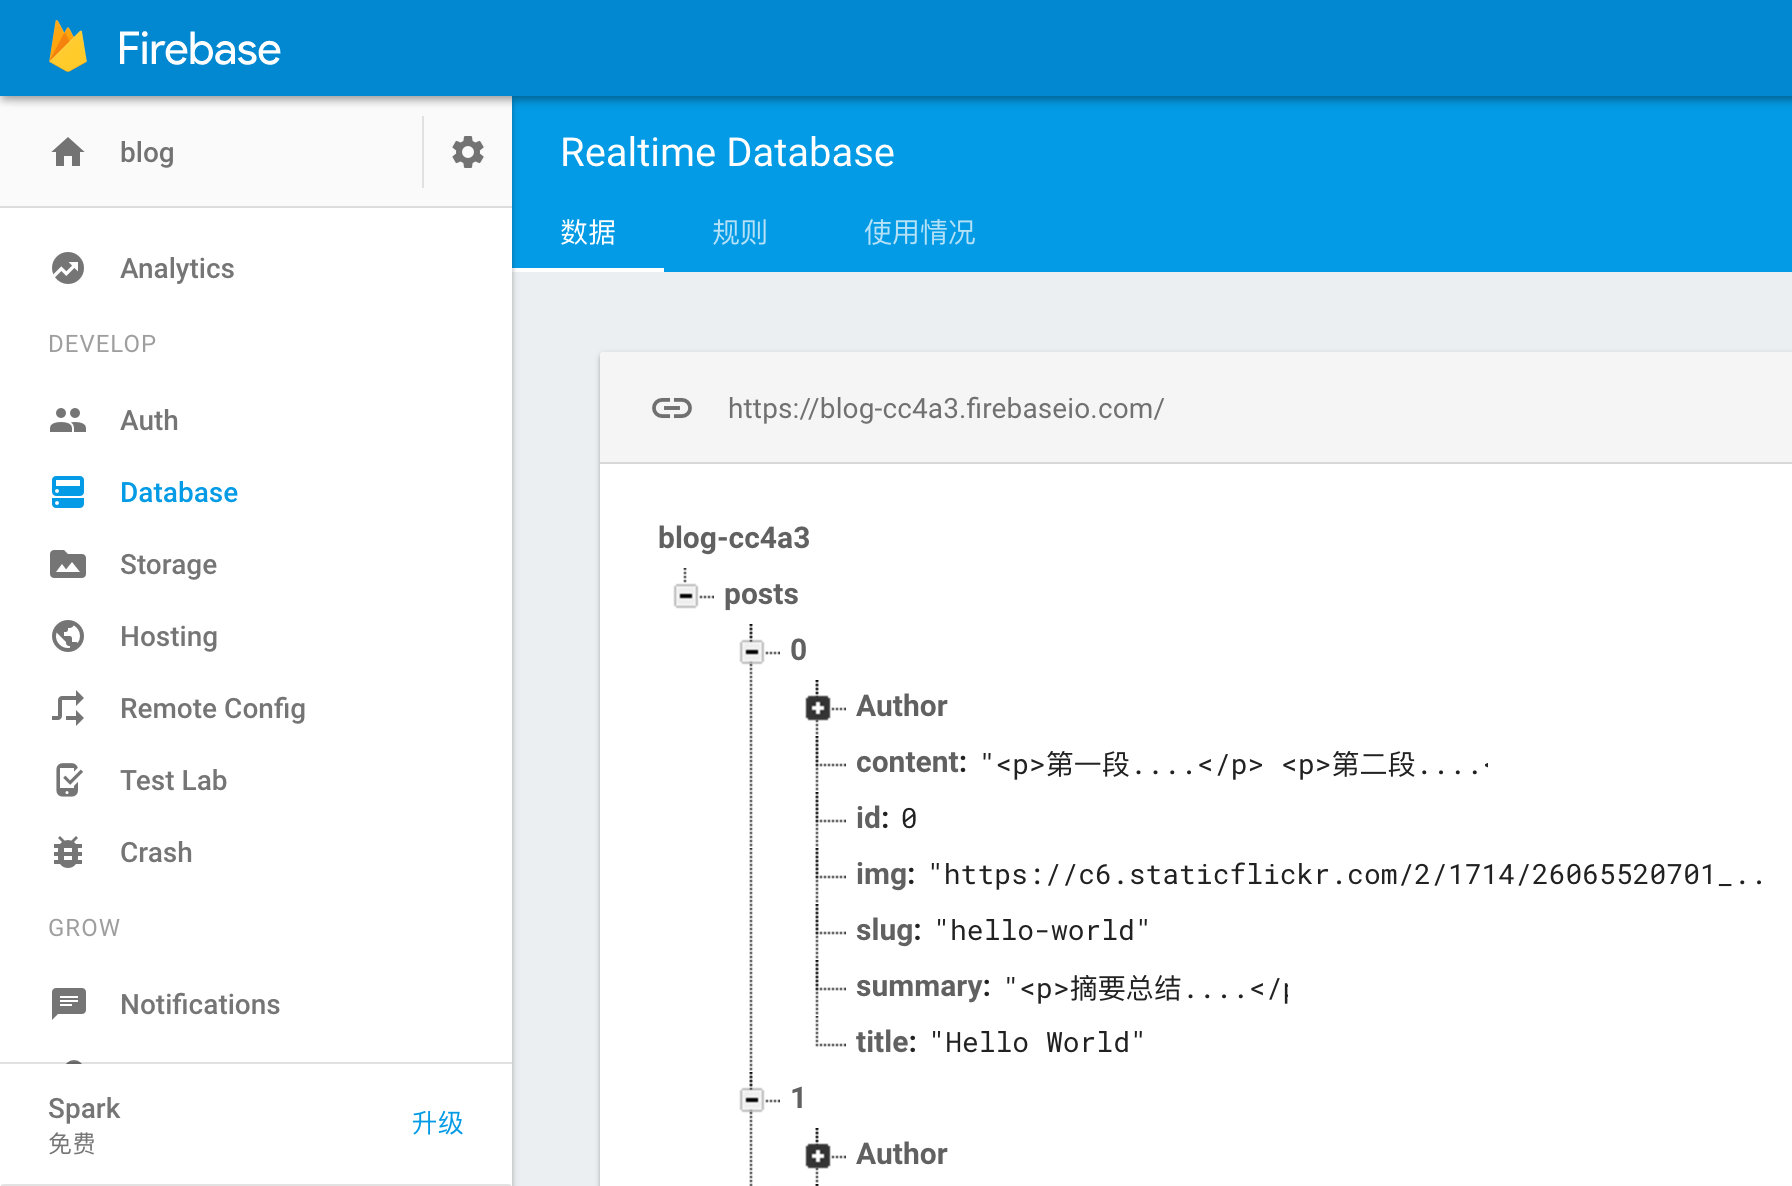
}这段 JSON 的意思是,该数据库可读不可写,并且会添加 id 和 slug 两个字段作为 posts “表”的索引。下一步开始添加内容,先创建一个文本,比如 posts.json , 然后导入到数据库。下面是一段模拟样本:
{
    "posts": [{
        "id": 0,
        "title": "Hello World",
        "slug": "hello-world",
        "img": "https://c6.staticflickr.com/2/1714/26065520701_f539c6fdd3_z.jpg",
        "summary": "摘要总结....",
        "content": "<p>第一段....</p> <p>第二段....</p>",
        "Author": {
            "name": "Kim Jong Un",
            "website": "http://www.korea-dpr.com/"
        }
    }, {
        "id": 1,
        "title": "第二篇文章",
        "slug": "second-post",
        "img": "https://c6.staticflickr.com/2/1626/25531344893_2fbe077ed8_z.jpg",
        "summary": "第二篇摘要总结....",
        "Author": {
            "name": "appblur",
            "website": "https://appblur.com"
        }
    }, {
        "id": 2,
        "title": "第三篇文章",
        "slug": "third-post",
        "img": "https://c6.staticflickr.com/2/1558/26066844261_734221c958_z.jpg",
        "summary": "第三篇摘要总结....",
        "content": "<p>第三篇第一段....</p> <p>第三篇第二段....</p>",
        "Author": {
            "name": "Cattla",
            "website": "https://google.com"
        }
    }]
}
到此,在Firebase 的操作部分,暂告一段落,接着我们得整点前端的事儿。
第二步:从 React 开始
上个月,面子书推出了一个 React 项目基础设施速成工具,Create React App 。 这个工具可以让你快速创建一个 React 项目,而无需担心要如何去设置 webpack,loaders,babel…..要如何配置,当然如何你对这几项工具十分熟悉,完全可以自己 DIY,毕竟这才最合你意。下面介绍的使用速成工具。
1,安装 create-react-app,全局安装
npm install -g create-react-app2,然后终端进入某个目录,运行
create-react-app blog
可以看到该目录多了一个 blog 的文件夹,文件结构如下
blog
├── package.json
├── node_modules
|	└── ...
├── favicon.ico
├── index.html
├── README.md
└── src
	└── ...
这个过程可能花费时间会长一点,因为依赖也安装好了。接着开始终端运行:
cd blog
npm start
此时整个项目已经可以运行了,地址为: http://localhost:3000
第三步:设计
这一步我们要做的事情,是改变 blog 目录里的 index.html 和 index.css。
把 index.html 改成:
<!doctype html>
<html lang="en">
  <head>
    <meta charset="utf-8">
    <meta name="viewport" content="width=device-width, initial-scale=1">
    <title>React Blog</title>
  </head>
  <body>
    <div class="wrapper col-md-12 col-sm-12 col-xs-12">
      <div class="top col-md-12 col-sm-12 col-xs-12">
        <div class="title col-md-12 col-sm-12 col-xs-12">
          <h1>blog</h1>
        </div>
      </div>
      <div id="app" class="content col-md-12 col-sm-12 col-xs-12"></div>
    </div>
  </body>
</html>
把 /src/index.css 改成:
@import url(https://fonts.googleapis.com/css?family=Roboto:400,300,500,700);
@import "https://maxcdn.bootstrapcdn.com/bootstrap/3.3.7/css/bootstrap.min.css";

body{
 background: #efeff3;
 font-family: 'Roboto', sans-serif;
 -webkit-font-smoothing: antialiased;
  color:#212121;
  margin: 0px;
  padding: 0px;
}
.wrapper{
  position: relative;
  clear:both;
  margin: 0 auto 75px auto;
}
.top{
  background: #3F51B5;
  height: 180px;
}

.top .title {
  margin: 20px auto 0 auto;
}

.title h1 {
  font-size:24px;
  color:#FFF;
  font-weight:500;
}

.content{
  padding-bottom: 20px;
}

.card {
  float: none;
  margin: 0 auto;
}

.content .card.first {
  margin-top: -80px;
}

.card{
  position: relative;
  background: #fff;
  padding:50px;
  margin: 20px auto 0 auto;
  box-shadow: 0 2px 4px rgba(100,100,100,.1);
}

.card h2 {
  font-size:21px;
  font-weight:500;
}

.card h2 a {
  color:#000;
  text-decoration:none;
}

.card .date {
  color:#9e9e9e;
  margin-top:10px;
  font-size:14px;
}

.card .text {
  color:#212121;
  margin-top:20px;
  font-size:15px;
  line-height:22px;
}

a:hover {
  text-decoration: none;
}
好,设计完成!
第四步:添加配置
现在虽然 React 可以运行了,但还是一个静态页面,于是,我们必须创建组件(component)和添加配置文件,为了和 Firebase 连接,我们先在 src 目录创建一个 config.js 文件,如下:
export default {
  Key: "qozLgjZZjyQYuidozsJ7T7BBgZUxoaNnddhaEz0z",
  Domain: "blog-cc4a3.firebaseapp.com",
  DB: "https://blog-cc4a3.firebaseio.com",
  Storage: "blog-cc4a3.appspot.com"
}
注意替换成你刚创建的 Firebase 项目里的参数。至于 blog 文件夹里的其它没用到的文件,比如 App.css,logo.svg … 可以移除掉。
第五步:添加主组件 App.js
安装 firebase 模块
npm i firebase --save-dev
然后在 App.js 文件,把必需的 Firebase 模块和连接配置模块 import 进去。之后开始配置 Firebase,初始化一下。然后把原来的 React 组件移除掉,换上自己的。并且设置 state 的初始化,和 componentDidMount() 函数,完整代码如下:
import React, { Component } from 'react';
import firebase from "firebase/app";
import "firebase/database";
import config from "./config";

let FireConfig = {
  apiKey: config.Key,
  authDomain: config.Domain,
  databaseURL: config.DB,
  storageBucket: config.Storage,
};

firebase.initializeApp(FireConfig);

class App extends Component {
  constructor () {
    super();
    this.state =  {
        Posts : []
    }
  }
  componentDidMount() {
    let x = this;
    firebase.database().ref('posts/').orderByChild('id').once('value').then(function(data) {
      x.setState({
        Posts : data.val().reverse()
      });
    });
  }
  render() {
    return (<div></div>);
  }
}

export default App;
在 componentDidMount() 这个函数里,我们通过 id 这个参数和 data.val() 这个方法来获取 Firebase 的数据,会返回一个数组,数据获取成功之后,更新 React 的 state , 然后使用数组的 .reverse() 方法颠倒数组,以致让最后发表的文章(在数组最后),可以显示在最前面。
第六步:文章列表组件 Posts.js
从上面的 App.js 可以看出,render() 部分只有一个空的 div,这显然不够。于是我们还要创建其它组件,先在 src 目录创建一个名为 Components 的文件夹,然后进入并添加文件 Posts.js,这个 Posts 组件会从上面的 App 组件的 state 获取值,然后把这个值变成自己的属性(props),最后渲染出来。完整代码如下:
import React, { Component } from 'react';

export default class Posts extends Component {
  render () {
      let myclass = "card col-md-8 col-sm-12 col-xs-12"
      if (this.props.nkey === 0) {
        myclass = "card col-md-8 col-sm-12 col-xs-12 first";
      }
      return(
        <div className={myclass}>
          <img src={this.props.img} alt={this.props.title} width='100%' />
          <h2><Link to={`#/post/${this.props.slug}`}>{this.props.title}</Link></h2>
          <p className="date">By {this.props.name}</p>
          <p className="text" ref='summary'>{this.props.summary}.... <a href={`#/post/${this.props.slug}`}>Read More.</a></p>
        </div>
      );
    }
}
第七步:连接主组件和文章列表组件
上面说了 Posts 组件要从 App 组件获取值,就必需要把这两个组件连接起来。
在 App.js 加入一行
import Posts from "./Components/Posts";接着在 class 内添加一个方法,循环文章数组,把 Author,title,summary ,slug ,img 这几个字段 push 到一个新的数组里,在 App.js` class 内添加如下代码:
createPosts() {
	var arr = [];
	this.state.Posts.forEach((v, i) => {
		arr.push(<Posts key={i} nkey={i} name={v.Author.name} img={v.img} title={v.title} summary={v.summary} slug={v.slug} />);
	});
	return arr;
}
然后把渲染函数 render() 改成如下:
render() {
  return (
    <div>
      {this.createPosts()}
    </div>
  );
}
这时候,在终端运行 npm start ,项目是跑不起来的,甚至报错,还没完成嘛!
第八步:添加文章详情组件 Post.js
在 Components 文件夹,添加文件 Post.js ,先在该文件添加一下依赖,代码如下:
import React, { Component } from 'react';
import firebase from "firebase/app";
接着开始创建 React 组件,并设置初始状态和渲染方法,续写如下代码:
export default class Post extends Component {
  constructor () {
    super();
    this.state = {
      img: '',
      name: '',
      title: '',
      content: ''
    }
  };
  render () {
    return(
      <div className="card col-md-8 col-sm-12 col-xs-12 first">
        <img src={this.state.img} alt={this.state.title} width="100%"/>
        <h2><a href="#">{this.state.title}</a></h2>
        <p className="date">By {this.state.name}</p>
        <p className="text" ref="post"></p>
      </div>
    );
  }
}
接着就要开始获取数据了,根据 slug 这个字段来获取,同时 slug 也会用到 URL 路由上,等一下会讲到。我们先添加 ComponentDidMount() 函数,代码如下:
componentDidMount() {
  let x = this;
  let slug = this.props.routeParams.slug;
  firebase.database().ref('posts/').orderByChild('slug').equalTo(slug).once('value',function(data) {
    for (var v in data.val()) {
      if (v) {
        var {Author: {name, web}, content, id, img, slug, sum, title } = data.val()[v];
        x.setState({
          name, web, title, img, content, id, slug, sum
        });
        x.refs.post.innerHTML = x.state.content;
      }
    };
  });
}
第九步:添加路由
在这我们使用 react-routes,先用 npm 安装:
npm i react-router --save-dev
是时候开始来编辑一下 /src/index.js 这个文件了,先把组件 import 进去,再把路由相关也 import 进去。
import Post from './Components/Post';
import { Router, Route, hashHistory } from "react-router";
然后在 ReactDOM.render() 添加路由设置,在 index.js 添加下列代码:
ReactDOM.render(
  <Router history={hashHistory}>
    <Route path="/" component={App}></Route>
    <Route path="/post/:slug" component={Post}></Route>
  </Router>,
  document.getElementById('app')
);
貌似完成得差不多了,但还差一点点,需要再调整一下。
第十步:链接调整
使用 react-router 路由,要在常规的 HTML a 标签做个小调整。进入文件夹 src/Components/ 打开 Posts.js 文件,先把 react-router 的 Link import 进去。
mport { Link } from "react-router";
接着把这一行:
<a href={'/post/${this.props.slug}'}>{this.props.title}</a>
改成
<Link to={'/post/${this.props.slug}'}>{this.props.title}</Link>
差别只有两个,a 标签变成了 Link ,属性 href 变成了 to。注意这个 render 里有两个 a 链接。
最后,运行 npm start,哈利路亚!!!